Getting Started with Ambient Mesh: From 0 to 100 mph
In the dynamic world of cloud-native applications, managing the intricate dance between microservices can quickly become a complex challenge. Think about securing communication, understanding how services interact, and even routing traffic intelligently - these are all critical concerns that, if not handled efficiently, can bog down development and operations teams. This is where service meshes step in, providing a dedicated infrastructure layer to offload these complexities from your application code.
For a long time, Istio has been the dominant force in the service mesh arena, primarily known for its “sidecar” proxy model. While powerful, this approach introduced some trade-offs. Now, a new evolution of Istio, known as Ambient Mesh (or Istio’s ambient mode), is shaking things up. It promises to simplify operations, enhance performance, and offer a more flexible path to adopting service mesh capabilities.
This blog post will take you on a high-level journey, explaining what Ambient Mesh is, why it’s a game-changer, and how you can get started with it.
The Sidecar Story: Why We Need a New Approach
To truly appreciate Ambient Mesh, let’s briefly touch upon the traditional sidecar model. In this setup, a small, specialized proxy (often Envoy) is deployed right alongside each of your applications’ containers within a Kubernetes pod. This “sidecar” intercepts all network traffic entering and leaving your application, enabling features like:
- Mutual TLS (mTLS): Encrypting and authenticating all communication between services for robust security.
- Traffic Management: Routing and load-balancing requests, performing A/B testing, canary deployments, and retries.
- Observability: Collecting metrics, traces, and logs to understand service behavior and pinpoint issues.
While incredibly effective, the sidecar model isn’t without its challenges:
- Resource Consumption: Every single pod gets a sidecar, which means a significant increase in overall CPU and memory usage across your cluster, especially at scale.
- Operational Overhead: Managing the injection, upgrades, and lifecycle of these sidecars can add complexity. Often, changes to the service mesh require restarting application pods.
- Increased Attack Surface: Each sidecar introduces another component that needs to be secured and patched.
- Application-Level Impact: Though designed to be transparent, sidecars can sometimes subtly affect application behavior or require specific configurations.
Ambient Mesh was conceived to address these very pain points, offering a fundamentally different way to achieve the same powerful service mesh capabilities.
What is Ambient Mesh? A Glimpse into Its Architecture
Ambient Mesh introduces a “split proxy” architecture, moving away from the per-pod sidecar to a more distributed, infrastructure-centric approach. It achieves this with two primary components:
1. ztunnel (Zero Trust Tunnel)
Imagine a lightweight, lightning-fast proxy running per node in your Kubernetes cluster. Ztunnel is deployed as a DaemonSet, meaning one instance runs on each node. Its primary job is to handle all Layer 4 (TCP) traffic. This includes:
- Automatic mTLS: All communication between pods within the Ambient Mesh is automatically encrypted and authenticated using Istio’s secure tunneling protocol (HBONE), establishing a strong zero-trust foundation without any application changes.
- Workload Identity: It handles the secure identification of workloads for mTLS.
- Layer 4 Security Policies: Security policies based on infrastructure-specific attributes such as peer identity, namespace, and networking parameters.
- Basic Observability: It collects fundamental Layer 4 metrics, giving you insights into TCP connections.
- Resource Efficiency: By consolidating Layer 4 proxying at the node level, ztunnels significantly reduce resource overhead compared to injecting a full proxy into every single pod.
2. Waypoint Proxies
These are specialized, full-featured Envoy proxies that are optional and only deployed when you need Layer 7 (HTTP/gRPC) capabilities. Waypoint proxies provide the rich Layer 7 features Istio is known for:
- Advanced Traffic Management: Sophisticated routing rules, traffic splitting, A/B testing, retries, and circuit breaking.
- Deep Observability: Detailed request-level metrics, distributed tracing, and access logs for HTTP and gRPC traffic.
- Fine-Grained Policy Enforcement: Authorization policies based on HTTP headers, paths, and other application-specific attributes.
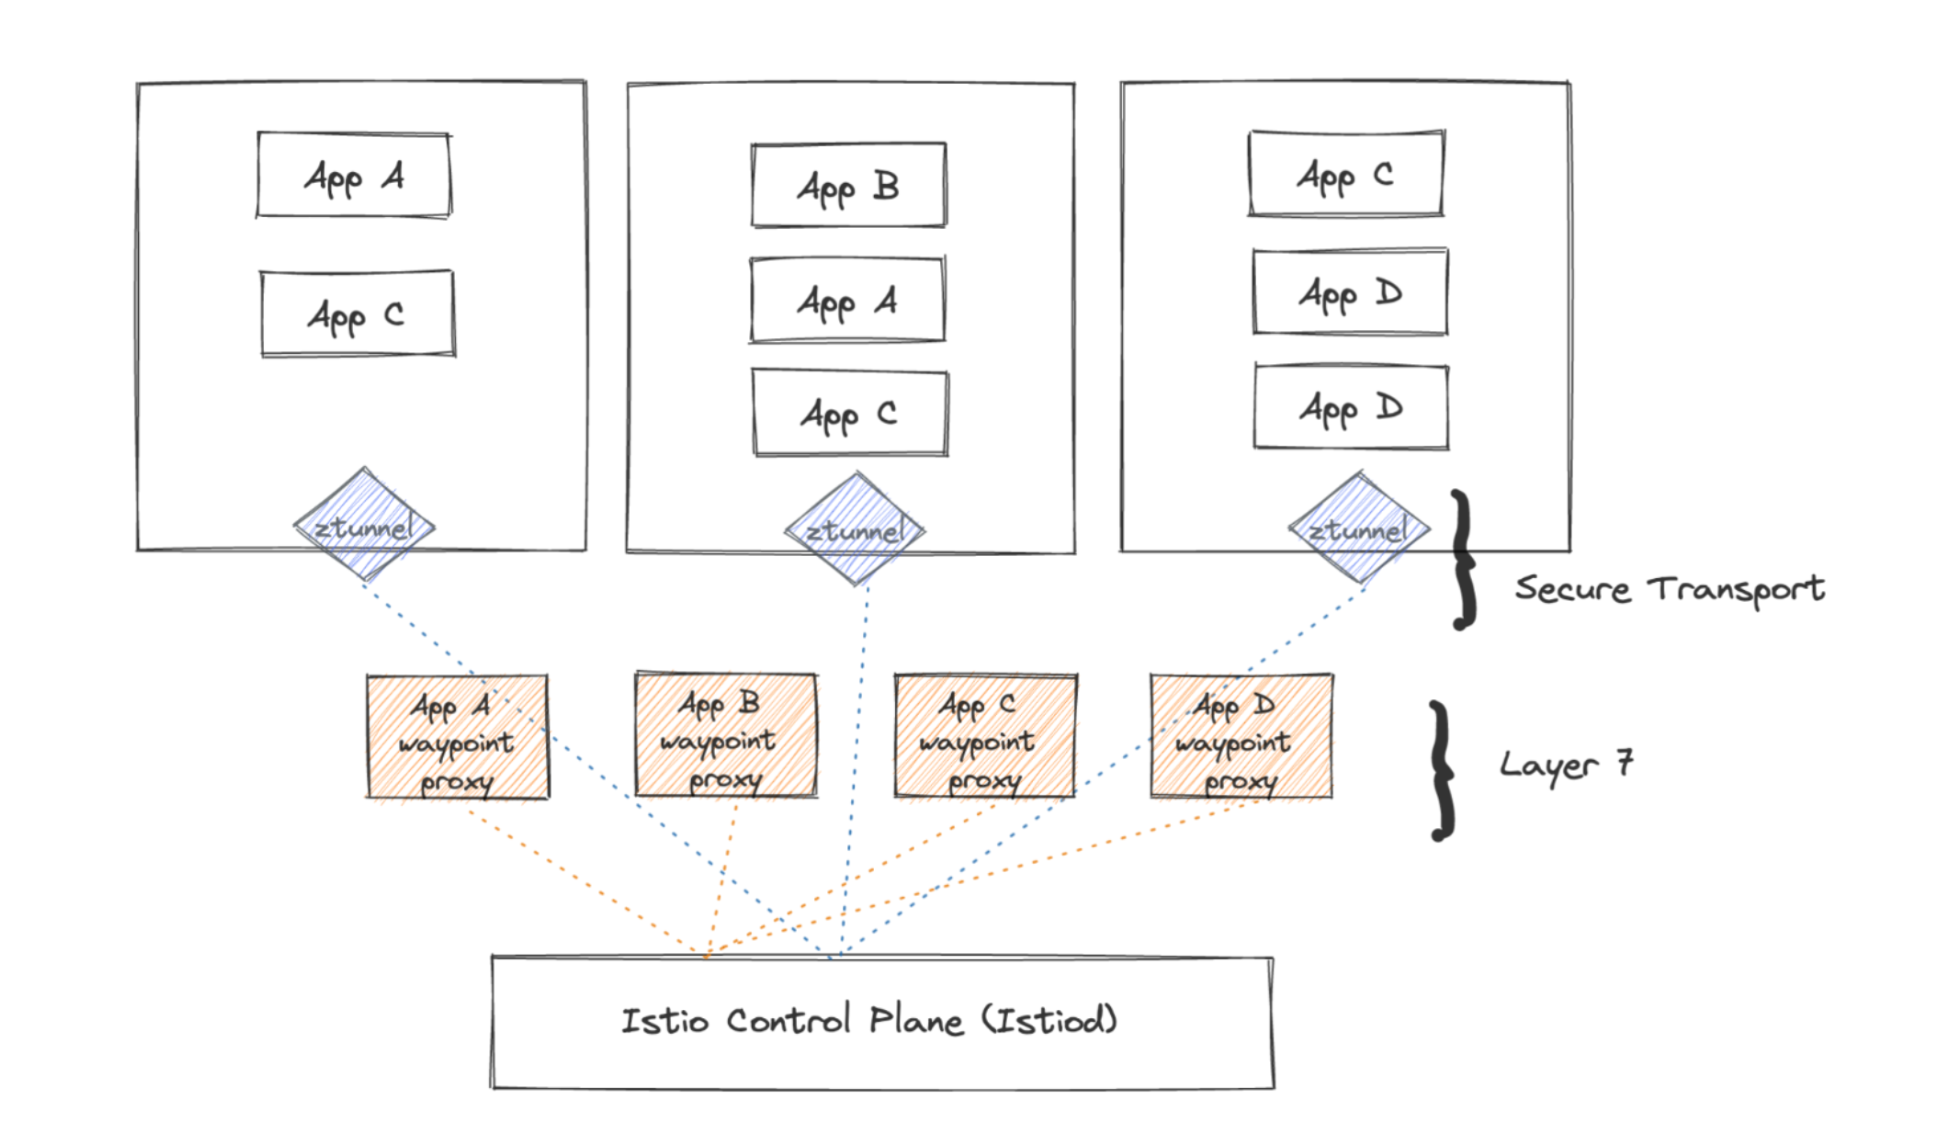
Ambient Mesh Architecture
The Brilliance of the Split: The true elegance of Ambient Mesh lies in this separation of concerns. By default, every service in a mesh-enabled namespace gets Layer 4 mTLS and basic observability via ztunnel – no sidecars, no application restarts, no fuss. You only introduce a waypoint proxy for services that explicitly require those advanced Layer 7 traffic management and policy features. This allows for a much more incremental and resource-efficient adoption of the service mesh.
The “Why”: Core Benefits of Embracing Ambient
Switching to Ambient Mesh offers several compelling advantages for organizations running Kubernetes workloads:
-
Operational Simplicity: Forget about the complexities of sidecar injection, pod restarts for upgrades, and managing a proxy in every single pod. With Ambient Mesh, you simply label a namespace, and your workloads are automatically part of the mesh.
-
Significant Cost Savings: By replacing resource-intensive per-pod sidecars with lightweight, node-level ztunnels, Ambient Mesh drastically reduces the CPU and memory footprint of your service mesh infrastructure. This translates directly into lower infrastructure bills.
-
Improved Performance: With a streamlined data plane, particularly for Layer 4 traffic, Ambient Mesh can offer better network performance and reduced latency, especially for workloads that don’t need constant Layer 7 processing.
-
Incremental Adoption: You don’t have to go all-in at once. Start with the foundational Layer 4 security and observability, and then layer on Layer 7 features with waypoint proxies only for the services that genuinely need them. This “pay-as-you-go” model makes service mesh adoption less daunting.
-
Stronger Security by Default: Zero-trust security, with automatic mTLS encryption and authentication for all Layer 4 traffic, is baked in from the start, providing a robust security posture without extra effort.
-
Better Developer Experience: Developers can focus on building their applications, knowing that the underlying network security and basic connectivity are handled by the infrastructure, without requiring specific code changes or complex proxy configurations.
From 0 to 100 mph: A High-Level Installation and Onboarding Guide
Getting Ambient Mesh up and running is surprisingly straightforward. While the detailed steps involve a few commands, the conceptual flow is simple. For a hands-on experience, try this free Getting Started with Ambient Mesh lab.
Phase 1: Setting up the Ambient Infrastructure
-
Install Gateway API: Ambient Mesh leverages the Kubernetes Gateway API for defining network routing, so ensuring it’s present in your cluster is the first step.
-
Install Istio Components: This involves installing the core Istio components, including:
- Istio Base: Fundamental Custom Resource Definitions (CRDs) and roles.
- Istio CNI: The component that redirects traffic to the ztunnels on each node.
- ztunnel: This deploys the actual ztunnel proxies as a DaemonSet across your nodes.
- Istiod (Control Plane): The brain of Istio, responsible for managing configurations and policies for both ztunnels and waypoint proxies.
Once these components are successfully deployed and running in your istio-system namespace, your cluster is “ambient-ready.”
Phase 2: Onboarding Your Applications
This is where the magic of simplicity truly shines.
- Label Your Namespace: To bring a set of applications into the Ambient Mesh, you simply apply a label to their Kubernetes namespace. For instance:
kubectl label namespace my-app-namespace istio.io/dataplane-mode=ambientThis single command tells Istio to configure the ztunnels on the nodes hosting pods in this namespace to automatically handle Layer 4 traffic for those pods. Your application pods do not need to be restarted, and no sidecars are injected. They instantly gain mTLS and basic Layer 4 observability.
- Deploy Waypoint Proxies (As Needed): If you have a specific service (my-service) within my-app-namespace that requires advanced Layer 7 capabilities (like fine-grained HTTP routing, A/B testing, or authorization policies), you then deploy a dedicated Waypoint Proxy for it. This is typically done by defining a Gateway resource from the Gateway API and then labeling the service to use that waypoint.
apiVersion: gateway.networking.k8s.io/v1beta1
kind: Gateway
metadata:
  name: my-service-waypoint
  namespace: my-app-namespace
spec:
  gatewayClassName: istio-waypoint
  listeners:
  - name: mesh
    port: 15008
    protocol: HBONE
kubectl label service my-service -n my-app-namespace istio.io/use-waypoint=my-service-waypointIstioctl, the command-line tool for Istio, makes this even easier by providing a powerful set of commands for creating and interacting with waypoints.
Once the waypoint is up, you can apply Istio’s powerful Layer 7 traffic management and policy resources (like HTTPRoute and AuthorizationPolicy) and bind them to this waypoint.
Observability in the Ambient World
Ambient Mesh maintains Istio’s strong commitment to observability:
-
Layer 4 Observability (via ztunnel): Even without waypoints, you get basic TCP-level metrics from the ztunnels, giving you insights into connection counts and byte transfers. This provides a baseline understanding of network activity.
-
Layer 7 Observability (via waypoint proxies): When waypoints are deployed, they expose the full suite of Layer 7 metrics (request counts, latencies, error rates), distributed traces (to follow a request through multiple services), and detailed access logs. Tools like Prometheus, Grafana, and Kiali integrate seamlessly to visualize this data, allowing you to quickly diagnose issues and understand application behavior.
High-Level Considerations for Production Readiness
While Ambient Mesh simplifies many aspects, moving to production always requires careful planning:
-
Resource Monitoring: Keep an eye on the resource consumption of istiod, ztunnel, and waypoint proxies. While more efficient, they still consume resources that need to be scaled appropriately for your workload.
-
Security Policies: Ambient Mesh empowers you to implement granular Layer 4 and Layer 7 security policies. Understand how to apply these effectively for your specific security posture.
-
Integration with Existing Ecosystem: Consider how Ambient Mesh fits into your existing CI/CD pipelines, monitoring tools, and security practices.
-
Migration Strategy: If you’re coming from a sidecar-based Istio deployment, plan your migration carefully. Istio provides tools and guidance to facilitate a smooth transition. Check out this whitepaper from Solo that offers a deeper dive into migration considerations.
The Future of Service Mesh is Now
Ambient Mesh represents a significant evolution in the service mesh landscape. By separating Layer 4 and Layer 7 concerns and eliminating the need for pervasive sidecar injection, it offers a more resource-efficient, operationally simpler, and incrementally adoptable path to leveraging the power of Istio.
For organizations seeking to enhance security, streamline traffic management, and gain deep observability into their microservices without the overhead of traditional sidecars, Ambient Mesh is a compelling solution. It allows you to “pay for what you need,” starting with a secure and observable network foundation and then adding advanced capabilities as your application requirements evolve. Solo.io has been at the forefront of this innovation, contributing significantly to Ambient Mesh and offering enterprise-grade support and solutions through Solo Enterprise for Istio.
Getting started with Ambient Mesh is less about a massive overhaul and more about a strategic, high-impact shift towards a more efficient and elegant service mesh architecture. It’s about accelerating from 0 to 100 mph with newfound agility and control over your cloud-native environment.
Embrace the ambient revolution - your applications (and your operations team) will thank you for it!